|
Photoshop: Create a Background using a Seamless Tile with a Parchment Texture This how-to can be used from version 7 and up. This how-to shows a method of creating seamless tiles for background textures. The how-to uses the "duplicate and flip" method. The example creates a parchment-paper seamless-tile. |
||
| 1) | Create a new document of 200 x 200 pixels: | |
|
|
The background contents doesn’t matter. |
|
| 2) | Set the foreground and background colors to a medium brown and cream: | |
|
It doesn’t matter which color the foreground and background are set to. |
||
| 3) | Make some brown/cream variation by rendering clouds. Select Filter -> Render -> Clouds: | |
|
|
||
| 4) | Boost the contrast a bit (Image -> Adjustments -> Brightness/Contrast…): | |
|
|
||
| 5) | Add some noise: | |
|
|
||
| 6) | Shrink the image in half: | |
|
|
||
| 7) | Duplicate the layer three times: | |
|
You can name the layers if you want. |
||
| 8) | Flop one copy horizontally, one vertically, and one both horizontally and vertically. Select a layer to flip: | |
|
and then use Edit -> Transform and choose either on, "Flip Horizontal" or "Flip Vertical":
|
||
| 9) | Double the size of the canvas to 200 x 200 pixels: | |
|
Note anchor the image in one corner.
|
||
| 10) | Move the layers appropriately, i.e. move the horizontally flipped layer to the right, the vertically flipped layer up, and the layer that was flipped both horizontally and vertically to the upper right corner (select the layer and use the move tool): | |
|
|
||
| 11) | Merge the layers: | |
|
|
||
| 12) | Use the Clone Stamp Tool to remove the seems and the mirror "reflections": | |
|
Select a size for the tool of about 45 with feathered edges. Before use (or the copied area in later use) set the tool by option-clicking on an area away from the edges that you want to copy. Apply the copied area around the image. It may help to do this step with the image zoomed in (enlarged). |
||
| 13) |
Save the image as a jpg or gif (File -> Save for Web…) depending on which gives the best result based on image size and quality. Generally a jpg saved with quality set to 0 (zero) will look OK as a background: |
|
|
|
||
| 14) | Create a webpage to test the image: | |
|
<!DOCTYPE HTML PUBLIC "-//W3C//DTD HTML 4.01 Transitional//EN">
If the image shows seams or mirror "reflections" go back to step 12. |
||
| 15) | Save the image.
|
|
|
This is the 200 x 200 pixels image produced by the above method.
|
||
|
|
||
Category Archives: Quickguide Series
Photoshop: Create Seamless Tile Background made with a Parchment Texture


Posted in Quickguide Series
Tagged background, how-to, parchment, Photoshop, seamless, texture, tile, v7.x
SciTechLab’s Quickguide: Installing MAMP
|
Installing MAMP |
|||||||||||||
|
These programs form an open source web platform built upon Mac OS X that are commonly used together to run dynamic web sites or servers. When used in combination they represent a solution stack of technologies that support application servers. MAMP should never be used as a live web server for the Internet because it lacks the necessary security. The idea for MAMP was as a PHP development environment for Macintosh computers. It also makes a fine home or small office off-Internet web server where security isn’t a major concern.
|
|||||||||||||
| 1) | Download MAMP |
||||||||||||
| 2) | Double-click on mamp_1.7.x.dmg to mount the image. |
||||||||||||
| 3) | Accept the license:  |
||||||||||||
| 4) | Drag the MAMP folder in the window to the Application folder | ||||||||||||
|
|
 |
||||||||||||
| 5) | Double-click MAMP.app |
||||||||||||
A browser window  |
|||||||||||||
and a start-up window  will appear. will appear. |
|||||||||||||
| 6) |
Done! |
||||||||||||
|
|||||||||||||
| SCQ-0002 | |||||||||||||

 The acronym MAMP refers to Mac OS X , the operating system; Apache , the web server; MySQL , the database management system (or database server); and PHP , the programming language.
 Posted in Quickguide Series
Tagged computer, Internet, MAMP, server, web, web server, wiki
SciTechLab’s QuickGuide Series: Using Pingbacks and Trackbacks
|
Pingbacks and Trackbacks |
|||||||||||||||||||||||||||||||||||||||||||||||||||||||||||||||||||||||||||||||||||||||||||||||||||||||||||||||||||||||||||||||||||||||||||||||||||||||||||||||||||||||||||||||||||||||||
|
|||||||||||||||||||||||||||||||||||||||||||||||||||||||||||||||||||||||||||||||||||||||||||||||||||||||||||||||||||||||||||||||||||||||||||||||||||||||||||||||||||||||||||||||||||||||||
| Pingbacks and trackbacks are simply methods for one blogger to give another blogger credit and let them know their blog has been useful. As a whole, they are called linkbacks. Linkbacks are a way to get your blog a wider audience. | |||||||||||||||||||||||||||||||||||||||||||||||||||||||||||||||||||||||||||||||||||||||||||||||||||||||||||||||||||||||||||||||||||||||||||||||||||||||||||||||||||||||||||||||||||||||||
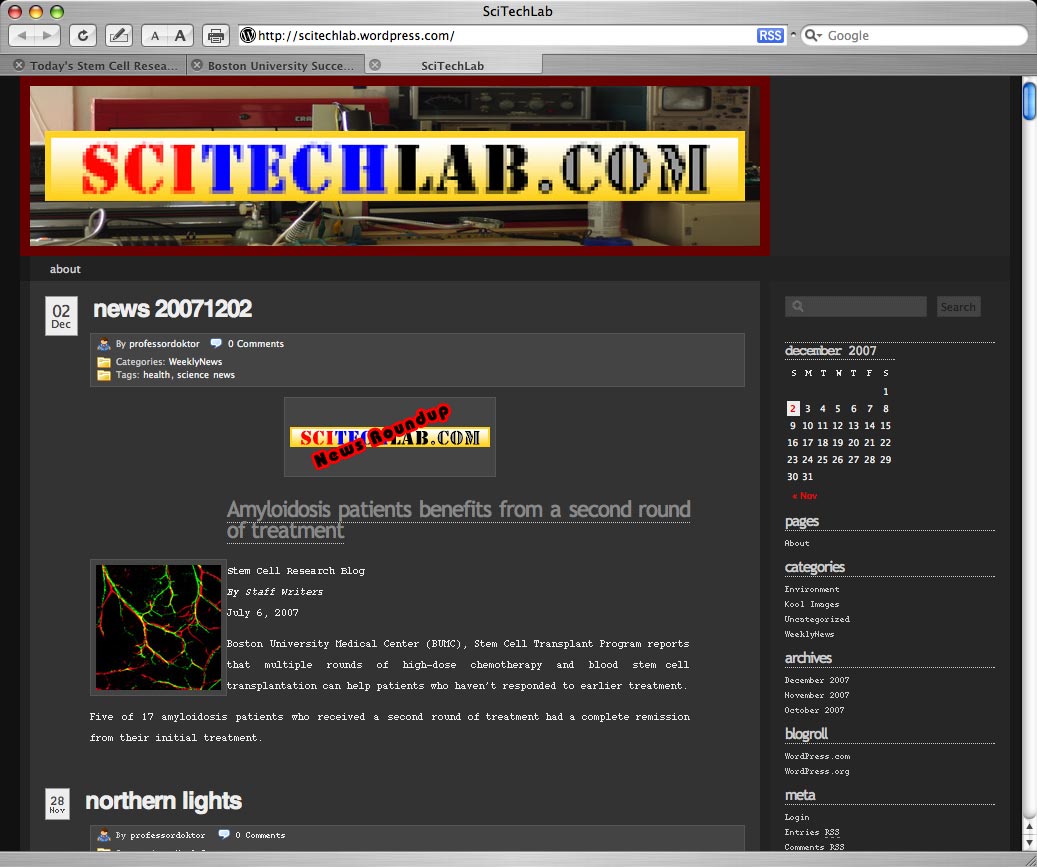
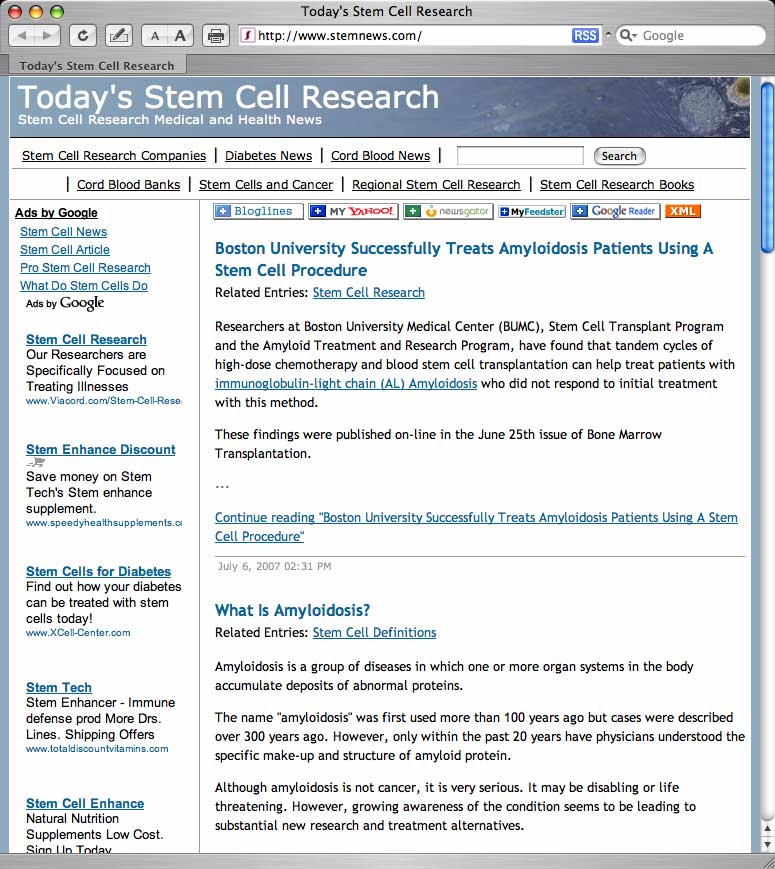 Lets say I’m reading Today’s Stem Cell Research (TSCR) blog (left) and I use information from the entry “Boston University Successfully Treats Amyloidosis Patients Using A Stem Cell Procedure.” If I write on my, blog SciTechLab (below), about how five of 17 amyloidosis patients who received a second round of treatment had a complete remission from their initial treatment and I want to let the TSCR blog’s author know I used some information from TSCR, I would use either a trackback or a pingback. |
|||||||||||||||||||||||||||||||||||||||||||||||||||||||||||||||||||||||||||||||||||||||||||||||||||||||||||||||||||||||||||||||||||||||||||||||||||||||||||||||||||||||||||||||||||||||||
 Pingbacks Pingbacks
Pingbacks are the easiest to use. The title of my entry “Amyloidosis patients benefits from a second round of treatment” has a standard hyperlink, "http://www.stemnews.com/archives/ stem-cell-research.html," to TSCR’s blog entry: . When I posted the entry, I checked the enable pingback box on my entry. |
|||||||||||||||||||||||||||||||||||||||||||||||||||||||||||||||||||||||||||||||||||||||||||||||||||||||||||||||||||||||||||||||||||||||||||||||||||||||||||||||||||||||||||||||||||||||||
|
On SSCR’s end the software will automatically check for the existence of a live link back to SSCR’s site on my SciTechLab blog. If a live link is found and TSCR has pings activated, then TSCR will adds a link back to my SciTechLab blog beneath its blog-entry. I have successfully pinged TSCR. |
|||||||||||||||||||||||||||||||||||||||||||||||||||||||||||||||||||||||||||||||||||||||||||||||||||||||||||||||||||||||||||||||||||||||||||||||||||||||||||||||||||||||||||||||||||||||||
| Trackbacks If you want to use trackbacks, you would need to search for a special link called a trackback link or trackback URL and copy the link’s URL address. |
|||||||||||||||||||||||||||||||||||||||||||||||||||||||||||||||||||||||||||||||||||||||||||||||||||||||||||||||||||||||||||||||||||||||||||||||||||||||||||||||||||||||||||||||||||||||||
 |
|||||||||||||||||||||||||||||||||||||||||||||||||||||||||||||||||||||||||||||||||||||||||||||||||||||||||||||||||||||||||||||||||||||||||||||||||||||||||||||||||||||||||||||||||||||||||
| These links are usually located just below a blog-entry. You’ll find two forms of trackbacks. Shown above is the hyperlink style. This looks like a regular link. To copy the URL address, just right-click it.
Below is a trackback link that is written in plain text style. Copy the URL address (https://scitechlab.wordpress.com/2007/12/03/scitechlabs-quickguide-series-using pingbacks-and-trackbacks/trackback/) just as you would any text. |
|||||||||||||||||||||||||||||||||||||||||||||||||||||||||||||||||||||||||||||||||||||||||||||||||||||||||||||||||||||||||||||||||||||||||||||||||||||||||||||||||||||||||||||||||||||||||
 |
|||||||||||||||||||||||||||||||||||||||||||||||||||||||||||||||||||||||||||||||||||||||||||||||||||||||||||||||||||||||||||||||||||||||||||||||||||||||||||||||||||||||||||||||||||||||||
| Once you have copied the trackback URL, the URL needs to be pasted into the trackback box that is on your bloging site’s "Write Post Panel." | |||||||||||||||||||||||||||||||||||||||||||||||||||||||||||||||||||||||||||||||||||||||||||||||||||||||||||||||||||||||||||||||||||||||||||||||||||||||||||||||||||||||||||||||||||||||||
 |
|||||||||||||||||||||||||||||||||||||||||||||||||||||||||||||||||||||||||||||||||||||||||||||||||||||||||||||||||||||||||||||||||||||||||||||||||||||||||||||||||||||||||||||||||||||||||
| Now post the blog-entry.
After the entry has been posted, your blog server software will send the trackback-signal to my SciTechLab blog site which will then add a link back to your blog beneath the SciTechLab blog entry. Note: Many sites disabled trackbacks (but not pingbacks) because of their susceptibility to spam because unlike pingbacks, a live link isn’t needed. |
|||||||||||||||||||||||||||||||||||||||||||||||||||||||||||||||||||||||||||||||||||||||||||||||||||||||||||||||||||||||||||||||||||||||||||||||||||||||||||||||||||||||||||||||||||||||||
|
|||||||||||||||||||||||||||||||||||||||||||||||||||||||||||||||||||||||||||||||||||||||||||||||||||||||||||||||||||||||||||||||||||||||||||||||||||||||||||||||||||||||||||||||||||||||||
| SCQ-0001 | |||||||||||||||||||||||||||||||||||||||||||||||||||||||||||||||||||||||||||||||||||||||||||||||||||||||||||||||||||||||||||||||||||||||||||||||||||||||||||||||||||||||||||||||||||||||||